| Welcome To Our “The Philosophy & Rewards Of Survival” Section |
Kurt Saxon
about a quart of 90 proof alcohol for less than a dollar.
So I gathered up all the books I had concerning alcohol and
set out to master the process on a small scale. My Emporium of Arts and Sciences
of 1814 told of whisky production in Lancaster County, PA. In a year, from 611
stills, 3,295,500 gallons, or 5,394 gallons per still, or an average of 14.77
gallons per still per day was produced. Going by the low level of technology in
1814 the process had to be pretty simple. And it is.
Whiskey. In Lancaster county, Pennsylvania, during a year
ending with April 1814, six hundred and eleven stills, manufactured 3,295,500
gallons of whiskey.
But try finding that simple process in a modern book. Most of
the books on the subject are frauds. No beginner could learn how to make ethyl
alcohol from any of them.
Take “The Moonshiner’s Manual”, by a man calling
himself Michael Barleycorn, copyright 1975. The book is entertaining, cleverly
illustrated, but filled with misinformation and nonsense. I’ll criticize it, but
only to show you why you can’t depend on such books to live up to their claims.
 When
When
you buy a book telling you how to do something illegal, to complain that it is
inaccurate is almost an admission that you’re up to no good. The publisher banks
on that. That’s why shady outfits like Delta, Paladin and Butokukai keep
cranking out garbage to sell to suckers. Books with sensational titles and
seductive ad copy, but with nothing of value between the covers.
Getting back to “The Moonshiner’s Manual”, it says
to put 25 pounds of cracked corn in a gunny sack and soak it in a tub of warm
water for three days! It suggests that natural fermentation will come into play.
What you would get in that three days would be 25 pounds of, not fermented, but
rotted corn. Then you are supposed to put the corn, sack and all, into the vat
with 30 pounds of pure cane sugar and 1-2 quarts of molasses.
In a later, scaled down recipe, he calls for 2 1/2 to 5
pounds of cracked corn, in a small sack, 5 to 10 pounds of sugar and 1 pint of
molasses or 1 cup of unflavored malt.
The corn, sack and all, is to be put into the fermenting vat.
Insane! The part about the gunny sack is an old technique for sprouting the
corn.
Sprouting, or malting, turns most of the starch into sugars
and diastase. The sugars are readily converted into alcohol by yeast and the
diastase acts on the remaining starch to turn it into dextrine, also quickly
acted on by the yeast.
The gunny sack is filled with whole, non-hybrid corn, not
cracked. The sack is immersed in a tub of warm water and left for 24 hours, then
drained. Then it is flooded with warm water once every 24 hours until it expands
and bursts. These are sprouts. Plenty of dextrine and diastase. No cane sugar is
needed. To throw the sack into the fermenting vat would be stupid.
The sprouted grain is then pulverized and put in the
fermenting vat. Water and yeast are added and the fermentation proceeds apace
Both recipes call for molasses, which is unnecessary.
It should be obvious that Michael wrote the book to sell to
suckers and had no real knowledge of moonshining.
He goes into great detail about the penalties attached to
moonshining. This has a purpose and is a paradox at the same time. First, he’s
scaring the average reader out of any notion of making his own booze. This keeps
most from trying the techniques, finding them useless and demanding refunds. The
paradox arises in the fact that no one could use these instructions for making
alcohol, thus, the warnings are unnecessary.
Another book, and a good one, is “Solargas”, by
David Hoye, 1979. This is about fuel. Hoye goes to great lengths to make sure
the smallest batch is poisoned by denatured alcohol, lest a sip pass the lip.
Only one page tells of making alcohol from ground, unsprouted
corn. All other references are to sprouted corn.
There are two bars to making booze by following this book.
The first is the constant harping on getting Federal permission and filling out
all those forms. This intimidates. The second is that you can no longer buy
non-hybrid corn at your local feed and seed store. It is all hybrid and only
about 10% will sprout, leaving 90% a rotten mess. You have to buy it from a
farmer who grows non-hybrid corn or grow it yourself.
I didn’t know this until I began researching. I meant to use
Hoye’s book to make alcohol and then tell you how. I processed two pounds of
corn and was surprised to see that only one out of ten grains sprouted. The rest
rotted. Rotted starch doesn’t convert to alcohol.
There are several alcohol for fuel books on the market. Most
of them are inaccurate and therefore fraudulent. Even the best were published
with doubtful sincerity. I’m sure their publishers realized that nine out of ten
buyers of the books had no intention of converting their vehicles to alcohol.
Consider; you can modify your vehicle’s engine to run on alcohol, propane,
methane, diesel etc. Then, when you’re on the road and run out of fuel you don’t
just turn into the nearest gas station, turn a knob on your engine and reconvert
to gasoline. No. If you convert, you’re stuck with it until you convert back.
Moreover, aside from all the forms and bureaucracy with the
Feds, converting, even for farm vehicles, isn’t cost-effective. And if you
intend to go commercial, you face a starting cost of maybe a hundred thousand
dollars, not to mention bucking the competition.
So, I repeat my contention that the average guy who buys a
book on making alcohol wants to save on his liquor bills. With what you are
going to learn here, you will never need to buy booze again, much less another
silly book on making it.
But before we go into that, let me explain the law. You can
distill alcohol if you pay the liquor tax on it. So if you don’t pay the liquor
tax, with all the red tape that involves, the bottom line is that you are guilty
of tax evasion.
Sure, they can jail you, take everything you have, put your
wife on the street, sell your kids. I’m not really kidding!
But so what? If you’re making your own, how can anyone know
what you do when you’re alone?
Even so, let’s say the Feds wanted to harass you. They have
to prosecute, in these days of overcrowded jails and backed-up court dockets.
Then they have to prove to a jury that your still was for making alcohol,
instead of for purifying water as is done in hundreds of thousands of homes,
with stills bought mainly from Sears.
Or maybe you admit you made the still but it’s a lab still
for ever so many uses, even for purifying water. Unless they catch you in the
act of distilling alcohol, how could they prove it to a jury?
Many people have asked me if it is advisable to carry a
concealed weapon. I ask them if they have ever been searched by the police. The
answer has always been no.
So I ask what makes a person think he will be searched after
he begins to carry a concealed weapon?
The same goes for distilling. Even so, I am not encouraging
you to break the stupid law. You shouldn’t even drink. But when this system
unravels a bit more, you will have a trade which will insure your survival. The
techniques I’ll show you in this and following articles will enable you to make
beer, wine, whiskey, etc. It’s easy.
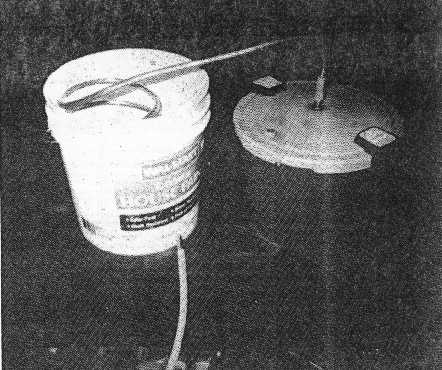
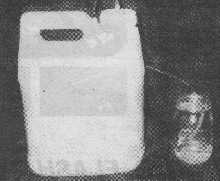
The equipment won’t be expensive, either. It can consist of a
food dryer like mine, a Corona grain mill and a pressure cooker (unless you have
a Kenmore water purifier from Sears). You will also need ten feet of 3/8 inch
copper tubing, bought at most hardware stores for 50 cents a foot. The rest is
just odds and ends you may have or can get at little cost.
 I’m
I’m
not going to write everything in this article because I don’t have room and it
would be too much to absorb at this time. Instead, I’ll show you how to make the
still and how to run off a quart of very high-proof alcohol.
It would be best for you to get a Kenmore Water Purifier from
Sears. Otherwise, get a pressure cooker of at least one gallon capacity. That’s
the pot for the still. Mine is a teflon-coated Presto Chicken Fryer of a one
gallon capacity. I don’t know how much it cost new as I got it for a couple of
dollars a a garage sale. You may have to get one new but make sure it’s coated
as alcohol reacts with aluminum.
You need a pressure cooker. Otherwise the alcohol will go out
into the air if you just use any old cook pot, no matter how close-fitting the
lid. Also, it takes a little pressure to force the fumes through, especially if
the coil isn’t completely slanted and pressure is needed to push the liquid
alcohol through.
Next get 10 feet of copper tubing. Copper is better than
plastic or rubber. It causes no bad taste. Also, it gives up heat into the cool
water better than plastic or rubber and will last a lifetime.
 Next
Next
get a two gallon plastic paint bucket or similar. Drill a 3/8 inch hole near the
bottom of the bucket.
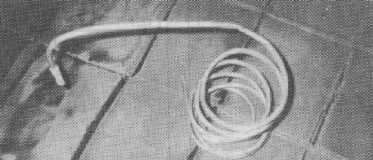
Now for bending the coil. You do it an inch at a time and it
is pretty tedious. It takes a few minutes to get the hang of it but then you’ll
be moving right along.
First, bend one end downward to connect with the pressure
cooker vent. You’ll not get the copper tubing over the vent so you will need
about two inches of 3/8 inch latex tubing, bought at any pharmacy for about 60
cents a foot.
When you have the downward bend done, without crimping it, go
over about 14 inches and start on the coil itself.
Keep bending so you have circles about six inches across. It
shouldn’t crimp if you bend it gently an inch at a time. But if it does start to
crimp, just use a pair of pliers on each side of the crimp to pressure it back.
When you have five or six circles, shove the end through the
hole in the bucket. Next use some GOOP to seal it inside and out. GOOP can be
bought at any good hardware store. It is a plastic sealant, quite thick and
takes a couple of hours to set and about 24 hours to really harden.
the bucket, squeeze a large dollop on a pencil and stick it down to the tubing
in the hole. Work it around and under and it will sag evenly and flow around the
tube and rest on the bottom of the bucket.
Then take the tube of GOOP and squeeze some around the
outside tubing. After a few minutes it will sag and, with the pencil, pull up
the sag and place it back around the tube and it will begin to harden. A day
later it will be hard and your condenser will be water-tight forever.
If the end of the tube protrudes only a couple of inches from
the condenser and that’s not enough to reach over the stove to flow into the
container, you can attach a few inches of latex tubing to it so it will be long
enough.
Now you want to find the proper temperature for distilling.
Put a gallon of water in the pot and set it to boiling. Then turn down the heat
to a rolling boil and mark the setting on the stove or hot plate so you can just
set it in place from then on.
Alcohol boils at 173 degrees F and water boils at 212. The
rolling boil is slightly lower but much hotter than needed to vaporize alcohol.
But that’s alright. So some water will come over. But the alcohol will flow with
the higher temperature. When the alcohol is out the flow will stop and be
replaced by a trickle which will be water and the distilling will be finished.
To test the system, and so you can do something right away,
buy a gallon of cheap wine with an alcohol content of 10-13%. When I was a bum I
would pour a gallon of $3.00 Burgundy into my still and put a quart jar under
the spout. When the flow of alcohol turned to a trickle of water, sure enough, I
would have a quart of about 90 proof alcohol. It added up to at least $11.00
worth of hard liquor for only $3.00.
I would cut that with juice or whatever and have enough to
party with my friends or have several glorious drunks. You can’t get that
crocked on 13% volume wine.
If you have made your own still, you need to cool the
condenser so the alcohol will liquefy. If you are using a hot plate to heat the
pot, you can situate the still by the sink. With another hole drilled near the
bottom of the bucket and another tube coming from the cold faucet, the warm
water would be constantly replaced by cold as the water left the bucket by
another tube into the sink.
 But
But
that is an awful waste of water and would show up on your utility bill. You
could use ice cubes, which is quite a job. My way was to freeze cans of water. I
would put several average cans of ice in the bucket and fill it with water. As
they melted I would just transfer a can of water back to the freezing
compartment of my fridge and replace it with another ice can.
If you have a setup by a stream, you would have a faucet at
the bottom of the condenser. With the faucet open you would replace the warm
water with buckets of cold from the stream.
Now to the making of basic moonshine. For this you will need
at least one cat-litter container. These are the perfect size for a batch of
mash. They are sold in every supermarket for about $5.00. If you have cats, you
may already have some or may get them from friends. Barring that, it is worth
the price for the container.
These containers hold about 2 1/2 gallons. A batch of mash is
1 gallon and 3 quarts, so there is plenty of room. You can also watch what’s
happening.
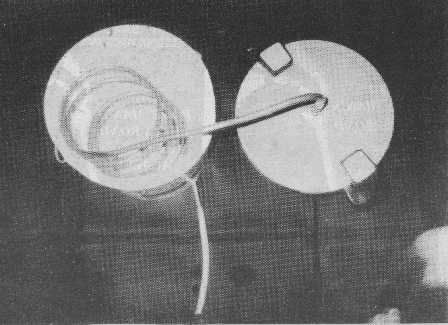
First you drill a quarter-inch hole in the cap and push a
half-inch of two feet of quarter-inch plastic tubing through and GOOP it on both
sides. This is an ingenious way of knowing when the yeast has stopped working
and the alcohol content is as high as it is going to go. You put the end of the
tube into a jar of water and the carbon dioxide from the working yeast comes up
through the water in the jar. When the bubbles stop coming, or slow to a burp
every two minuets, it is ready. This also keeps your working mash odor-free.
Next, you finely grind two pounds of corn, sprouted to about
a half inch, in your Corona grain mill. Then get a cook pot holding over two
gallons. They are relatively cheap at Wal-Mart and can be gotten for a couple of
dollars from most second-hand stores. Avoid aluminum. Use stainless steel or
enamel.
Pour in two gallons of hot tap water and then bring it to a
brisk boil. Then dribble in the ground corn meal, stirring all the while so it
doesn’t lump.
Cooking the mash serves two purposes. First, it breaks down
the starch granules so the yeast can more effectively work on them. Second, it
kills any bacteria which might otherwise spoil the mash.
After thirty or forty minutes, take the pot off the heat and
put it in a dishpan of cold water to cool it down. It shouldn’t have any lumps
in it since that would cause uneven fermentation. If you have stirred it
properly, there should not be any lumps. In case there are, break them up with
any hand mixer.
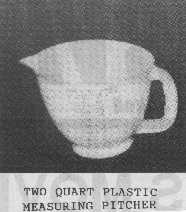
Now for the yeast-sugar mix. Weigh out 1/2 pound of sugar and
put it in a measuring pitcher. Then add hot water until it reaches the quart
mark. The sugar should cool it to a temperature safe for the yeast. If it feels
warm but not hot, dump a package of active dry yeast (not fast-rising or acting
yeast) into the sugar and warm water. Stir it with a fork until it dissolves.
Then put a plate over the pitcher and let it alone for about an hour. It will be
covered with froth. Stir it again and then look to the mash.
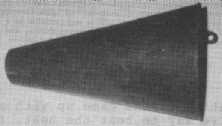
Pour the mash into the cat-litter container. For this you
will need a funnel, lest it slop. The best funnel is one bought at any
auto-supply department and is used for putting transmission fluid in your
engine. Cut the funnel off nine inches from the top. This will allow 1 1/2
inches down inside the container and 1 1/2 inches across to let the mash flow
smoothly.
 If
If
the mash is warm but no longer hot, pour in the yeast and sugar and give the
container a few sloshes. But don’t try to get it totally mixed. If it should be
mixed too much, it might rise up and clog the tube. This would cause pressure
and blow the lid off and mash would be all over the place.
If you don’t use the cat-litter container, measure the one
you use for at least 2 1/2 gallons. Never fill it with the mixture past the 2
gallon mark.
Now, put the container in the warmest part of your home, but
not over 85 or 90 degrees. The warmer it is within the safe limits, the faster
it will work.
With the cap on firmly and the tube in the jar, the bubbles
should appear in an hour or so. After a few days, they will slow down and
finally stop, at least except for a burp every couple of minuets.
Now you are ready to distill. It is too much trouble to
separate the liquid from the mash. The cooked mash isn’t too inclined to stick.
But it is a good idea to add water to completely fill the container when it is
ready to distill and then to shake it well before pouring some into the still.
Thus diluted the mash is pretty much in suspension so it won’t stick or burn.
Fill the pot only two-thirds full and keep the heat at Medium.
When it heats up, the alcohol will come over in a fairly fast
trickle. When the alcohol is all out you’ll notice a decrease, indicating it is
only water. Taste it. You’ll know.
That is all there is to it!
So far, you’ve just learned the basics. If all this is
totally unfamiliar, you might think it is too much to tackle. It isn’t. Even so,
you might make mistakes at first.
Think of yourself as a youngster watching your mother make a
three-layer chocolate cake with icing. She barely looks at the the cookbook and
it turns out great and tastes wonderful. Now you try it. You follow the recipe
exactly. You wind up with a real mess.
You are not expected to do everything right the first time.
You will blunder. But like your mother had to learn, to make it all look so
easy, you will learn and you will be doing these processes while barely looking
at the instructions.
![]()
A brief note on the quality of the images you’ve just seen. Kurt misplaced the
original file containing the photographs for this article so I was stuck with
using the newsprint copies taken right out of The Survivor. I am just beginning to understand all the things that can be done with Adobe’s Photo Shop imaging
software. Just as soon as I can, I’ll “touch up” all of the above
photos in an attempt to make them look a little better.—Cary
![]()